
10 Best Easter Crafts for Kids
Easter is traditionally a holiday for family members to come together and have fun. However, it’s also a perfect opportunity to teach your kids crafts and important life skills not taught in school. Examples of crafts include painted eggs, decorated candles and handmade favour boxes, just to mention a few. This article discusses the ten best crafts to keep your kids hyper-excited throughout the Easter holiday.
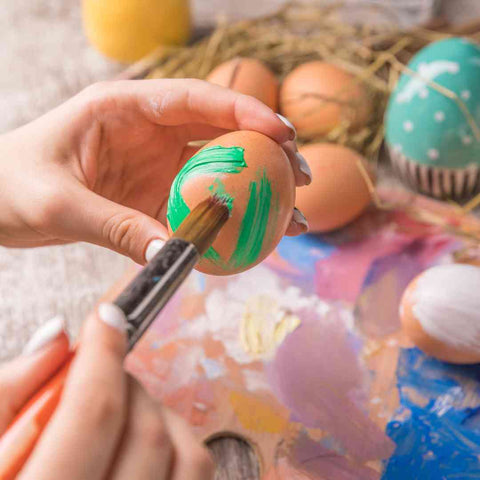
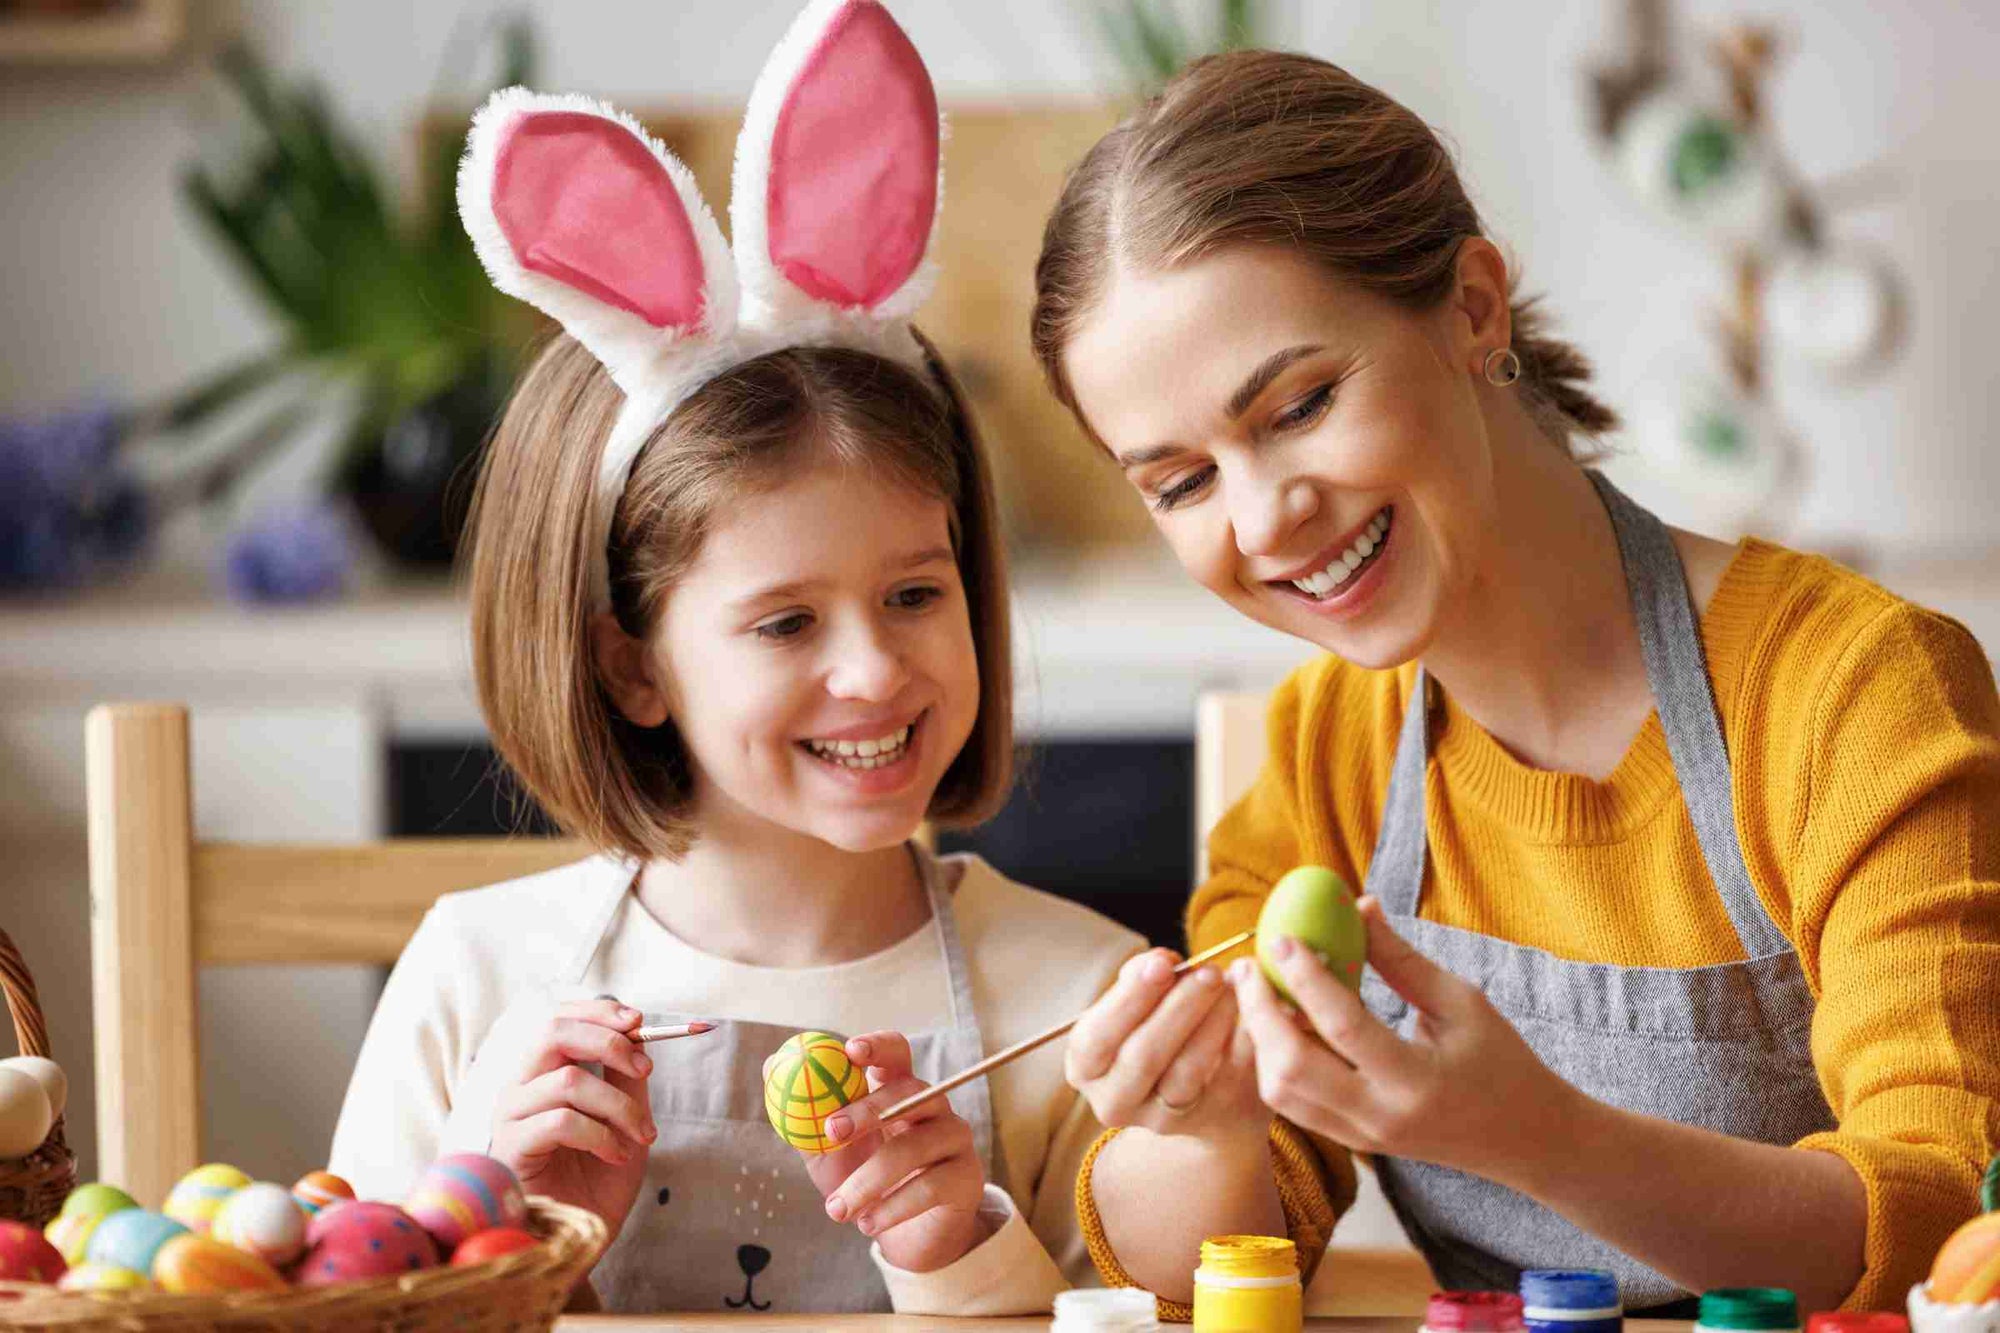
1. Painted Eggs
Painted eggs are one of the most familiar and fun Easter crafts you can participate in with your kids. To start, blow out an egg to create an empty shell. Making a blown egg is a simple process where you prick the ends of an egg and blow from one side to remove the egg content. You may find it helpful to use a small drill piece or sharp cuticle scissors to create the holes as you need to avoid cracking the shell. Blowing out the egg content is also easier if the yolk is punctured first. You can do this by inserting a skewer through the hole. Next, wash the eggshell and wipe it to make it ready for painting!
If you’re uncomfortable with the blown egg process, you can instead use wooden eggs. The aim is simply to get creative with paints and brushes. Let your kids unleash their creativity by playing with patterns and mixing colours. It’s a great opportunity for them to learn about colour theory in a fun and practical way!
You could also introduce different painting techniques such as spattering or dotting. Spattering involves dipping a toothbrush into paint and then flicking the bristles to ‘spray’ paint, whereas dotting is created by dipping a dotting tool or cotton bud into paint. They are both very striking techniques when used with contrasting colours.
Once the kids have finished painting, place the painted eggs on a rack to dry. You can then thread them with ribbon to hang or display them on a candle holder.
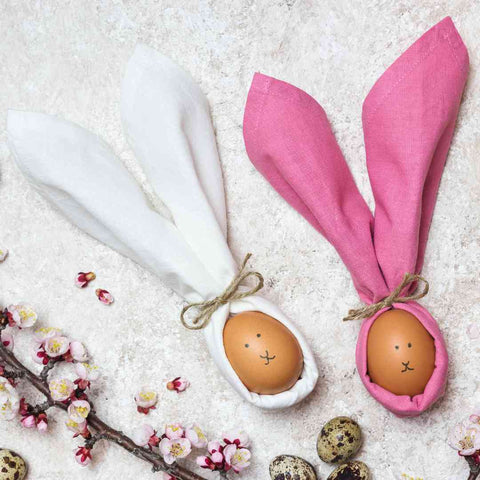
2. Napkin Bunnies
Don't napkin bunnies look adorable? The good news is you can help your kids create them using materials you already have in your home. Simply choose a napkin – fabric or paper - and fold it once along the diagonal side to form a triangle. Ironing makes the fold firmer and easier to work with.
Roll the napkin from the top part of the triangle to the base, and place a decorated egg at its centre. Next, gather both ends of the napkin and tie a ribbon around the join to create bunny ears.
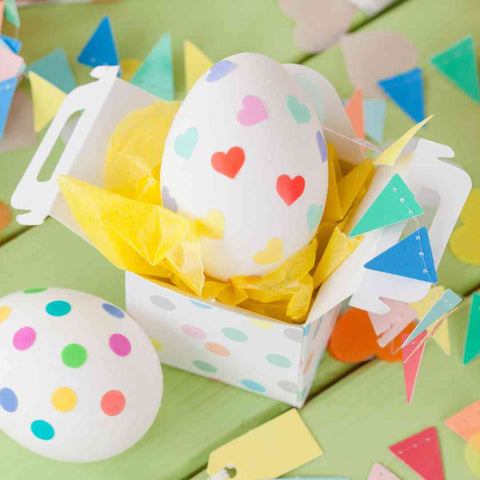
3. Fun Favour Boxes
Favour boxes can look great on an Easter dinner table. Create some with your kids to show their visiting friends. Place grapes, berries or other colourful fruits in them for an attractive, non-chocolate treat. The good thing is that making favour boxes is a simple process.
Start by finding a small box to use for the structure. Empty matchboxes or small tea boxes are ideal. Then, using coloured paper or gift wrap, decorate the box as you please. You may choose to cut flower shapes or spots to glue to your box. Or perhaps you’ll add some bunny ears or a cardboard handle to resemble a basket. There are lots of ways to make simple favour boxes for Easter so it’s fun for kids to use their imaginations and create something unique.
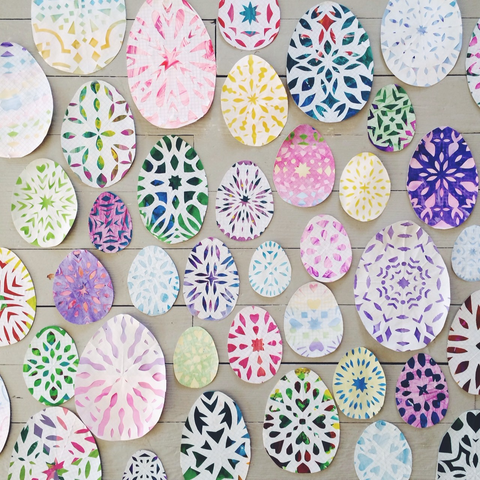
Photo credit: Magnesium Blue
4. Stencil Easter Eggs
Another Easter craft that will spark your child’s inner creativity is to make stencil eggs. Your kids will love creating their names, shapes and patterns using a stencil technique. First, cut egg shapes from thick coloured paper or use pre-made paper templates. Next, fold the paper eggs symmetrically and then cut a variety of shapes, similar to making paper snowflakes. Unfold to reveal your patterned paper egg.
Now, your children may use these paper ‘stencils’ to create Easter arts and crafts. The paper cutouts are ideal for decorating Easter greeting cards or making Easter bunting. Your children can also make new art by placing the stencils onto paper and gently sponging with paint. This transfers the cut patterns to the paper underneath.
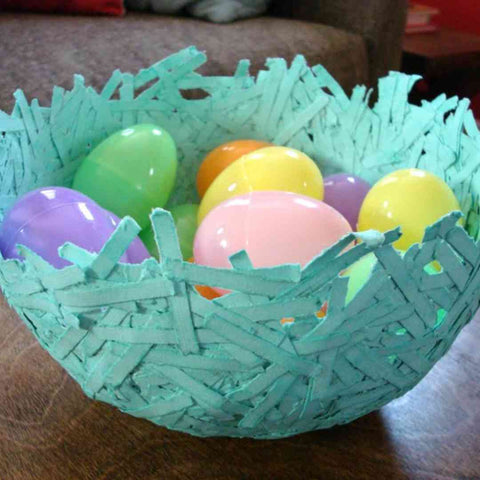
Photo credit: Lansdowne Life
5. Recycled Paper Egg Nests
If you have paper waste piling up, why not recycle it into an egg nest this Easter? First, shred or finely cut the paper. Then, blow a balloon and tie its end. Place the balloon – tied end facing downwards – into the top of a jar, ensuring it fits snuggly. Next, make a glue solution using flour and water or diluted school glue. Now, dip the paper shreds into the glue solution and spread them across the balloon, criss-crossing and layering to create an upside-down nest shape.
When you’re satisfied with the appearance of your paper nest, put it in a well-ventilated place to dry thoroughly. This may take a day or two, depending on the thickness of your nest. Once your paper nest is dry, you can pop the balloon and remove it. Your nest is ready to fill with Easter eggs, flowers or other goodies.
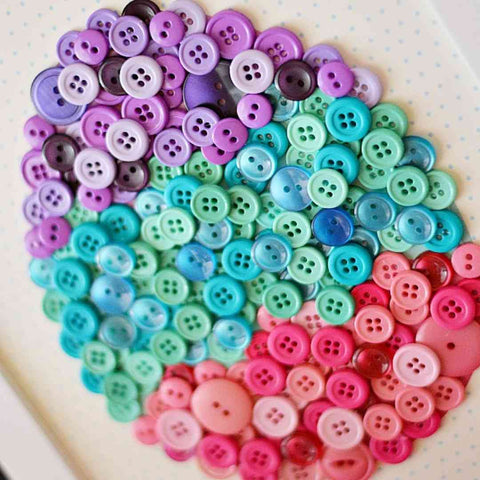
Photo credit: A Cultivated Nest
6. Button Eggs
It’s time to put the spare buttons in your sewing basket to use! With just a few steps, kids can make colourful button eggs. First, paint handblown or wooden eggs with your favourite colours and allow them to dry.
Once the painted eggs are dry, gather some buttons in similar colours. Now, using a hot glue gun (parental supervision advised), stick the buttons onto the eggs to create a beautiful piece of Easter craft. You can also use this technique to create a beautiful framed picture. Simply paint an Easter egg onto watercolour paper and, when dry, cover with coloured buttons.

Photo credit: Etsy
7. Decorated Candles
Showing your kids how to make decorated candles is an easy craft to keep your kids from screens this Easter. The best part is it takes only a few short steps. All you’ll need is taper candles, rubbing alcohol, and markers to do this.
First, use rubbing alcohol to remove dirt and other impurities on the candle's surface. Then, use Magic Markers or paint pens to draw patterns on one half of the candle. Let it dry before switching ends and decorating the other half of the candle.
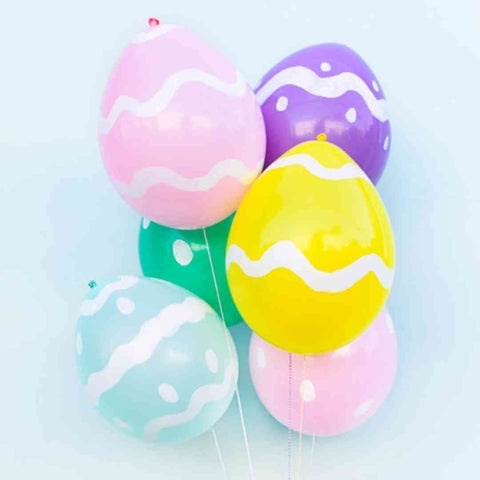
Photo credit: Studio DIY
8. Easter Balloon Eggs
Balloons adorn most festive occasions because they make fantastic decorations. So, helping your kids make Balloon Eggs this Easter will add to the fun. However, we recommend choosing natural latex or biodegradable balloons as these are better for our environment.
To start, let your kids inflate the balloons and help them tie the end with string. Next, using a paintbrush and acrylic paint, decorate the balloons to resemble Easter eggs. Examples include polka dots, stripes, and other attractive patterns. Once dry, form a bunch of Easter Balloon Eggs to make a fabulous table centrepiece or corner feature.

Photo credit: Real Mom Kitchen
9. Floral Door Hanger
If you like to incorporate nature into your kids’ craft, then you’ll love this clever and colourful decoration! Take a moment to make an umbrella flower arrangement to hang on your front door this Easter. You’ll require colourful cut flowers and other greeneries for this craft.
Start by getting one child to hold a partially open umbrella with the open part facing upwards to resemble a ‘vase’. Now, get another child to assist with arranging the flowers inside it. Ensure the flower stems are trimmed for a smooth appearance. Finally, holding it all together, tie a ribbon around the middle to complete your ‘bouquet’.
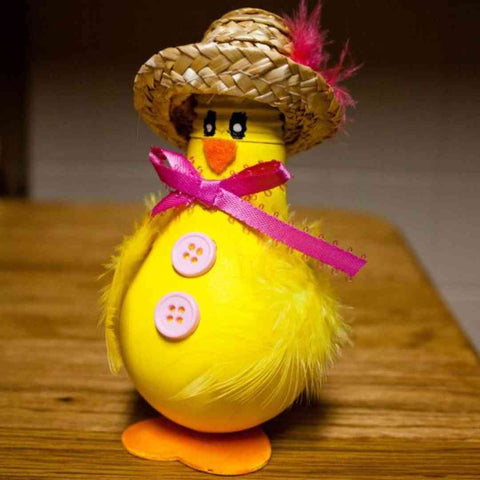
Photo credit: Pinterest
10. Light Bulb Chicks
Chances are you have blown light bulbs lying around your house. Instead of throwing them away, boost your child's imagination by turning them into a cute Easter Chicks craft project. Paint your light bulbs white or yellow to form the bodies of your chicks. Place them on a rack to dry. Next, paint on your chick’s features. Try using different colours to make your chicks unique.
Now, you can complete your chick’s appearance by adding some feathers, goggle eyes, pipe-cleaners or paper cut-outs. Finally, glue some cardboard feet to the base. This will help support your chick and finish your figurine.
Make Your Kids Happy With Easter Crafts
Keep your kids engaged this Easter by helping them create simple crafts. With any of the above kids crafts, your children will develop new skills and have fun along the way. Better still, you’ll create a memorable Easter holiday and forge a stronger family connection. Hop to it!